Difference between revisions of "WiFi telescope and camera control"
From Just in Time
m |
m (→Software) |
||
| (17 intermediate revisions by the same user not shown) | |||
| Line 1: | Line 1: | ||
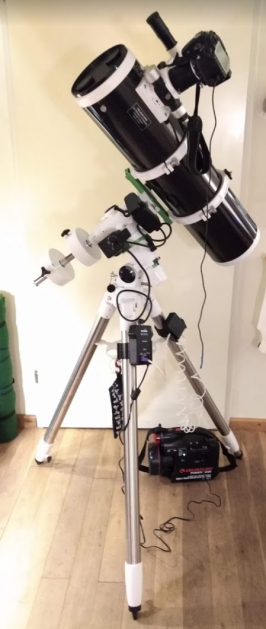
| − | + | I'm so happy with my new telescope! This Skywatcher 150mm telescope (150P-DS) came with a decent motor-controlled mount with go-to capability (EQM-35 Pro). Out of the box, it comes with a SynScan hand controller, which is fine, if somewhat tedious to use. However, when using this mounts go-to capabilities with a WiFi bridge (instead of the hand controller) and the SynScan Pro app this telescope is a pure joy to use. | |
| − | I'm so happy with my new telescope! This Skywatcher 150mm telescope (150P-DS) came with a decent motor-controlled mount with go-to capability (EQM-35 Pro). Out of the box, it comes with a | ||
| − | The WiFi adapter is | + | The app also has a function to control a camera attached to the mount controller. Unfortunately, the EQM-35 Pro is not equipped with a SNAP port, the port to which a camera can be connected, so with a regular WiFi adapter, you can't use that functionality. |
| + | |||
| + | It would be nice to have a WiFi-to-serial bridge that could also implement the camera controls sent by SynScan Pro app. And luckily, with cheap WiFi enabled microcontrollers available, this is relatively easy to do! | ||
| + | |||
| + | [[File:Telescope and camera.png|alt=Telescope and camera|Telescope and camera|629x629px|left|thumb]] | ||
| + | |||
| + | ==System overview== | ||
| + | [[File:Partem system overview.png|frameless|400x400px]] | ||
| + | |||
| + | |||
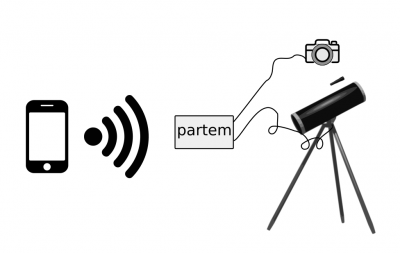
| + | "Partem" is a device that will either connect to a WiFi network or act as a WiFi access point itself. The device will listen to a UDP port and forward incoming data to its serial port. The serial port is connected to the motor controller of a SkyWatcher telescope mount. This setup allows the SynScan Pro app to communicate with the mount. Whenever the SynScan Pro app sends SNAP port messages, these messages will be intercepted and used to control a camera connected to the device. | ||
| + | |||
| + | == Hardware == | ||
| + | The system consists of a Wemos D1 mini, two BS170 N channel Mosfets, used as switches and a mini DC-DC buck converter. This connects to the RJ-45 socket on the EQM-35 mount, where it takes 12V power and connects to the 3.3v serial Rx and Tx lines. | ||
| + | |||
| + | Two of the D1's GPIO pins control the mosfets while the D1's serial port lines can be connected directly to the serial port of the mount. Just to be sure, I've added 100R resistors on the serial lines. | ||
| + | |||
| + | Overal, the schematic is so simple that this could be implemented on stripboard. | ||
| + | |||
| + | [[File:Partem stripboard.png|alt=|300x300px]] | ||
| + | [[File:Schematic stripboard layout.png|alt=|300x300px]] | ||
| + | |||
| + | [[File:Schematic.jpg|441x441px]] | ||
| + | |||
| + | To finish it off, the board is fitted into a [https://www.thingiverse.com/thing:4652797 3D-printed enclosure]. Because I had one lying around, I used an old RJ-12 (telephone) socket for the connection to the camera. The enclosure was then designed to accommodate for that connector. Typically, you'd want a stereo mini jack connector for such cables, because that's how they are often sold. | ||
| + | |||
| + | I instead bought a [https://www.ebay.com/sch/i.html?_from=R40&_nkw=shutter+cable++nikon+d90&_sacat=0&_sop=15 shutter release cable on ebay] (shop around, it may be cheaper on other sites) and soldered it to a telephone cable for additional length. | ||
| + | |||
| + | [[File:Partem_in_enclosure.png|alt=|334x334px]] [[File:Partem_enclosure.png|alt=|307x307px]] | ||
| + | |||
| + | == Software == | ||
| + | Sources are available on [https://github.com/DannyHavenith/Partem/blob/master/src/Partem.cpp github]. | ||
| + | |||
| + | The software receives UDP packets and for most, sends their contents verbatim to the serial port and vice versa. When receiving UDP data, the firmware will first examine the contents to see if any switch on/off instructions are being sent. If so, the package is intercepted and the switches are operated accordingly. Any other data is forwarded. | ||
| + | |||
| + | In other words, expressed in the universal language of "Arduino":<syntaxhighlight lang="c++"> | ||
| + | void loop() | ||
| + | { | ||
| + | FromUdpToSerial(); | ||
| + | FromSerialToUdp(); | ||
| + | } | ||
| + | </syntaxhighlight> | ||
| + | |||
| + | |||
| + | And:<syntaxhighlight lang="c++"> | ||
| + | /** | ||
| + | * Forward data that is received from the UDP port to the | ||
| + | * serial device. | ||
| + | */ | ||
| + | bool FromUdpToSerial() | ||
| + | { | ||
| + | auto packetSize = udp.parsePacket(); | ||
| + | if (packetSize > 0) | ||
| + | { | ||
| + | packetSize = std::min( packetSize, bufferSize); | ||
| + | remoteIp = udp.remoteIP(); | ||
| + | remoteUdpPort = udp.remotePort(); | ||
| + | |||
| + | udp.read( bufferFromUdp, bufferSize); | ||
| + | |||
| + | if (not HandleLocally( bufferFromUdp, packetSize)) | ||
| + | { | ||
| + | serial.write( bufferFromUdp, packetSize); | ||
| + | } | ||
| + | |||
| + | return true; | ||
| + | } | ||
| + | |||
| + | return false; | ||
| + | } | ||
| + | </syntaxhighlight> | ||
| + | |||
| + | In order to examine the communication between the SynScan app and this device, a [https://github.com/DannyHavenith/Partem/blob/master/analysis/emulator.py python script] was written that emulates a simplified version of the telescope motor-controller. This is just enough to get the SynScan app to connect to either the python script directly over UDP or through the Wemos D1 over an USB connection with the device. | ||
| + | |||
| + | The direct app-to-python script mode was useful to analyse how the Synscan app interacts with the controller and to determine the underdocumented features of the protocol (e.g. the app uses direct "AT+..." commands to configure the telescope's Wifi settings) | ||
| + | |||
| + | The app-to-controller-to-python script is a useful debug tool to see if the controller was correctly sending (or intercepting) messages from the app. | ||
Latest revision as of 11:01, 4 February 2021
I'm so happy with my new telescope! This Skywatcher 150mm telescope (150P-DS) came with a decent motor-controlled mount with go-to capability (EQM-35 Pro). Out of the box, it comes with a SynScan hand controller, which is fine, if somewhat tedious to use. However, when using this mounts go-to capabilities with a WiFi bridge (instead of the hand controller) and the SynScan Pro app this telescope is a pure joy to use.
The app also has a function to control a camera attached to the mount controller. Unfortunately, the EQM-35 Pro is not equipped with a SNAP port, the port to which a camera can be connected, so with a regular WiFi adapter, you can't use that functionality.
It would be nice to have a WiFi-to-serial bridge that could also implement the camera controls sent by SynScan Pro app. And luckily, with cheap WiFi enabled microcontrollers available, this is relatively easy to do!
System overview
"Partem" is a device that will either connect to a WiFi network or act as a WiFi access point itself. The device will listen to a UDP port and forward incoming data to its serial port. The serial port is connected to the motor controller of a SkyWatcher telescope mount. This setup allows the SynScan Pro app to communicate with the mount. Whenever the SynScan Pro app sends SNAP port messages, these messages will be intercepted and used to control a camera connected to the device.
Hardware
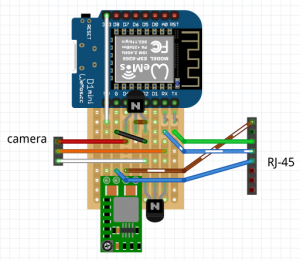
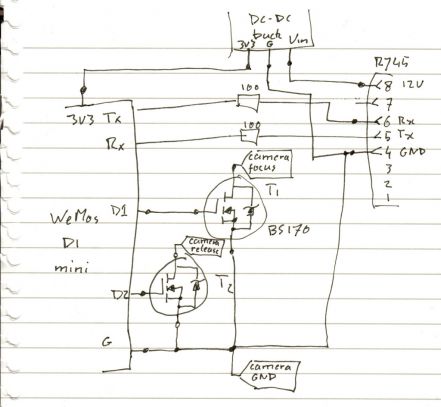
The system consists of a Wemos D1 mini, two BS170 N channel Mosfets, used as switches and a mini DC-DC buck converter. This connects to the RJ-45 socket on the EQM-35 mount, where it takes 12V power and connects to the 3.3v serial Rx and Tx lines.
Two of the D1's GPIO pins control the mosfets while the D1's serial port lines can be connected directly to the serial port of the mount. Just to be sure, I've added 100R resistors on the serial lines.
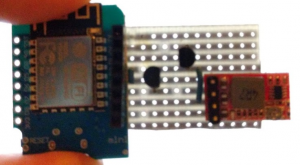
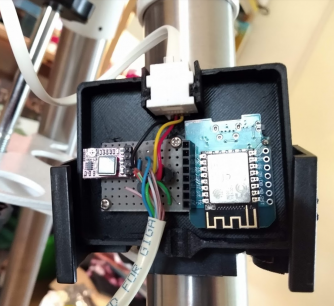
Overal, the schematic is so simple that this could be implemented on stripboard.
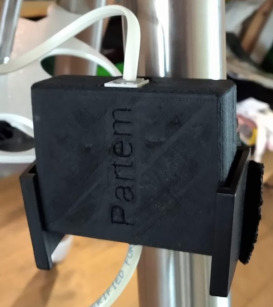
To finish it off, the board is fitted into a 3D-printed enclosure. Because I had one lying around, I used an old RJ-12 (telephone) socket for the connection to the camera. The enclosure was then designed to accommodate for that connector. Typically, you'd want a stereo mini jack connector for such cables, because that's how they are often sold.
I instead bought a shutter release cable on ebay (shop around, it may be cheaper on other sites) and soldered it to a telephone cable for additional length.
Software
Sources are available on github.
The software receives UDP packets and for most, sends their contents verbatim to the serial port and vice versa. When receiving UDP data, the firmware will first examine the contents to see if any switch on/off instructions are being sent. If so, the package is intercepted and the switches are operated accordingly. Any other data is forwarded.
In other words, expressed in the universal language of "Arduino":
void loop()
{
	FromUdpToSerial();
	FromSerialToUdp();
}
And:
/**
     * Forward data that is received from the UDP port to the
     * serial device.
     */
    bool FromUdpToSerial()
    {
        auto packetSize = udp.parsePacket();
        if (packetSize > 0)
        {
            packetSize = std::min( packetSize, bufferSize);
            remoteIp = udp.remoteIP();
            remoteUdpPort = udp.remotePort();

            udp.read( bufferFromUdp, bufferSize);

            if (not HandleLocally( bufferFromUdp, packetSize))
            {
                serial.write( bufferFromUdp, packetSize);
            }

            return true;
        }

        return false;
    }
In order to examine the communication between the SynScan app and this device, a python script was written that emulates a simplified version of the telescope motor-controller. This is just enough to get the SynScan app to connect to either the python script directly over UDP or through the Wemos D1 over an USB connection with the device.
The direct app-to-python script mode was useful to analyse how the Synscan app interacts with the controller and to determine the underdocumented features of the protocol (e.g. the app uses direct "AT+..." commands to configure the telescope's Wifi settings)
The app-to-controller-to-python script is a useful debug tool to see if the controller was correctly sending (or intercepting) messages from the app.
